Homemade Geiger Counter
Here I present to you a Geiger counter I made shortly after the Fukushima Daiichi nuclear power plant disaster which occurred on the 11th of March 2011 in Japan.


After the event Geiger counters became a popular electronics project all around the world, with Ukrainian merchants selling Soviet surplus Geiger-Muller tubes for a reasonable price, of which the most common tube for such projects was the SBM-20.
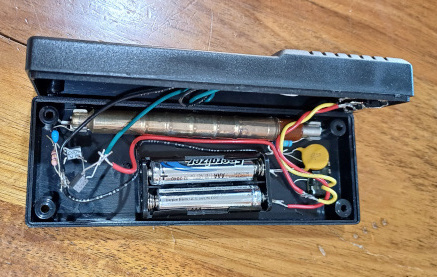
The Geiger-Muller tube is quite simple, consisting of a thin walled metal tube with a terminal at each end, one of which is connected to a conductor that runs straight down the centre of the tube, the other terminal being connected to the outside of the tube. The SBM-20 tube has a low pressure mix of gases consisting of Neon, Bromine and Argon. Said gases allow the tube to breifly conduct an electrical current from the tube wall to the centre conductor when a particle or ray ionises the gas as it passes through. Due to the properties of the gases the tube quickly stops conducting so that it can detect the next particle or ray.


The SBM-20 tube requires a 400 volt direct current power supply to function. Such a power supply was found from a Russian thermionic valve website. Said power supply is roughly half the size of a postage stamp, with three wires being +3 volt DC in, -0 volt common and +400 volt DC out. The tubes datasheet lists the required anode resistance of 5.1 Megaohm which limits the current that passes through the tube. The detection circuit is a simple pair of transistors which sends a short pulse to a speaker which makes the stereotypical crackle associated with Geiger counters, and a red LED for visual indication.
The enclosure of my Geiger counter looks like it was designed to be a child's walkie talkie with a grill for a speaker and a hole which accommodates a 3 mm LED perfectly. It was purchased on ebay from a seller in south east Asia.


I demonstrate the use and effect of the Geiger counter with the help of my father. A medical scan was performed with a dose of spicy hot sauce administered IV. Approaching my father results in a significant increase in detected activity, following the inverse square law.
I'm happy with the final product and the sense of achievement from when I finished assembling it, it's simple to operate, gives clear indication of ionising radiation and it will continue to be serviceable for future unfortunate events (hopefully not).